This section explains how to configure the physical spaces used by a Club, define the Space Types and Training Areas available in them.
Understand the setup order
Screenshot
Spaces setup overview
Show: The Spaces navigation with Space Types, Spaces, schedules and Training Planner.
Purpose: Make the dependency order visible before configuration begins.
Set up scheduling in this order:
Create the Space Types that describe the kinds of areas your Club uses.
Create the physical Spaces and arrange any parent and child Spaces.
Create a SpaceSchedule for a root physical Space.
Add the schedule's date periods and weekly rules.
Add Training Areas and assign each one a Space Type.
Open Planner and allocate Teams to compatible Training Areas.
Review the schedule and publish it when the allocation is ready.
Only Custodians and Directors can configure Space Types, Spaces, Schedules and the Training Planner. Your active Profile determines the Club whose records you are working with. See Switch your active Profile and Understand roles and permissions.
Create a Space Type
A Space Type describes what a Training Area can provide, such as a particular court, field or room format. Teams use the Space Type required by their Age category, so the name should be clear and consistent.
How to do it
Open Spaces → Types.
Select Create.
Enter a unique Space Type name for the Club.
Add an optional description.
Leave Active enabled when the type is available for new configuration.
Save the Space Type.
A Space Type can then be selected when you add a Training Area to a SpaceSchedule. Do not create duplicate types for the same requirement; use one shared type wherever the area capability is the same.
Create and organise a physical Space
A Space is a physical place used by the Club. Root Spaces are the locations that can own a SpaceSchedule. A Space can also have a parent Space when your Club needs a hierarchy for physical locations.
How to do it
Open Spaces → Spaces.
Select Create.
Enter the Space name and optional description.
Leave Parent Space empty for a root Space, or select an existing parent when the location belongs under another Space.
Leave Active enabled when the Space is available for scheduling.
Save the Space.
On the Spaces list, use the existing ordering controls when the physical order matters.
Create schedules against root Spaces such as a field, court block or main room. Child Spaces help describe the Club's structure, but the Planner works with the root scheduled Space and its configured Training Areas.
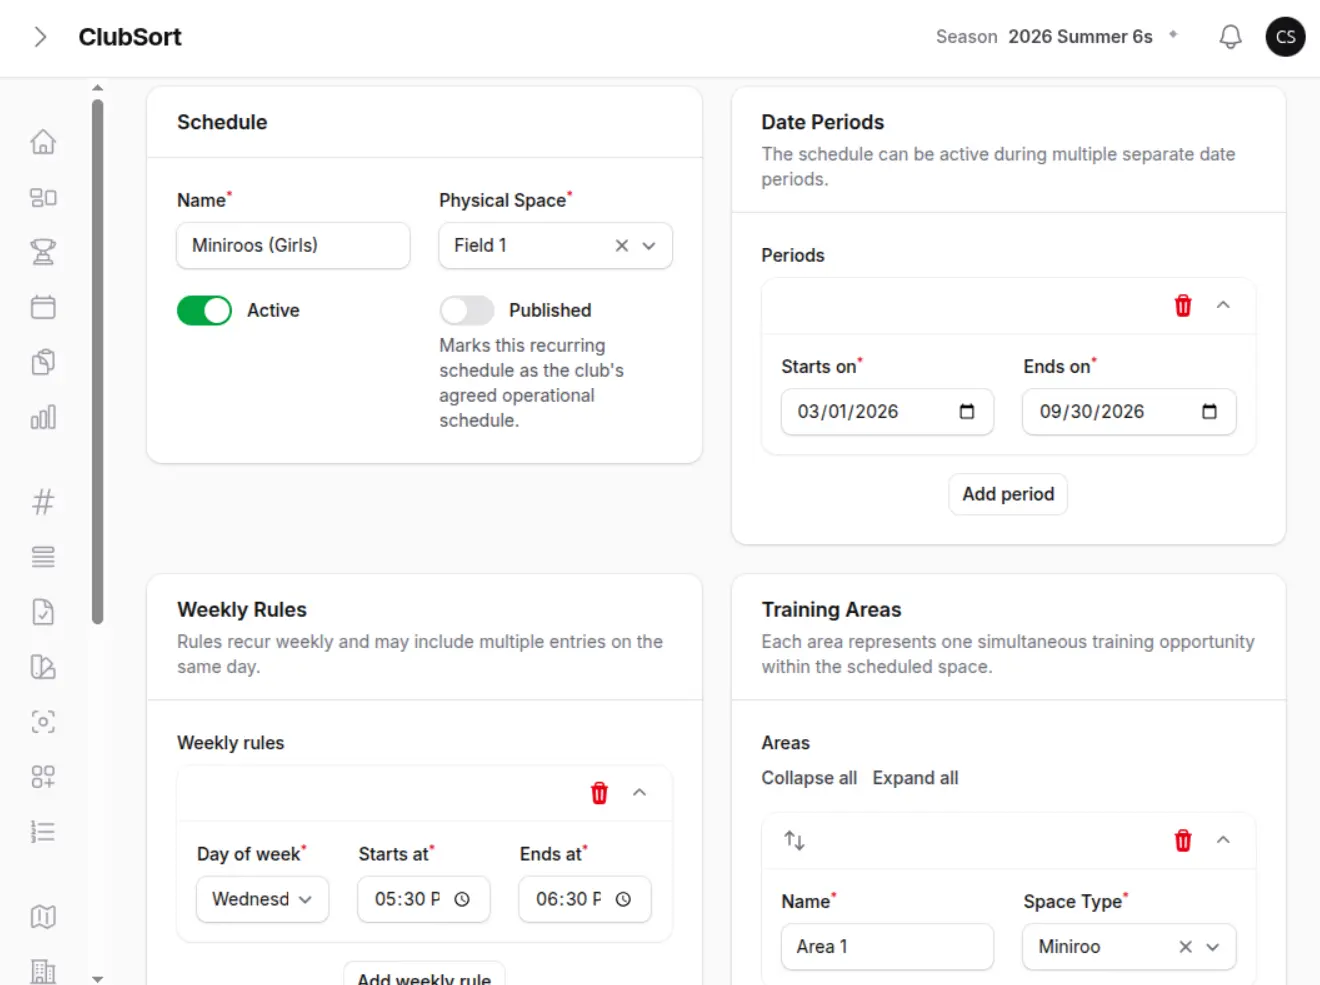
A SpaceSchedule describes a recurring allocation layout for one root physical Space. It is not an individual Event and it does not create attendance, notifications or calendar occurrences.
How to do it
Open Spaces → Schedules.
Select Create.
Enter the schedule name.
Select the Physical Space.
Add one or more Date Periods. A schedule may contain separate periods, for example a first and second part of a season.
Add one or more Weekly Rules. Each rule contains a day and start and end time. Multiple rules may use the same day.
Add the schedule's Training Areas.
Give each area a clear name and select its Space Type.
Save the schedule.
A schedule can be Active or inactive. Active schedules are available in the Planner. The schedule's Published state indicates whether the Club has published that recurring allocation configuration; it does not create Events.
Understand date periods and weekly rules
Date Periods describe when the schedule applies. Weekly Rules describe the recurring days and times within those periods. Keep both parts accurate so an administrator can understand what the schedule represents before allocating Teams.
For example, a schedule may contain:
`31 Aug - 2 Oct 2026`
`5 Oct - 29 Oct 2026`
`Mon 5:30-6:30`
`Wed 5:30-6:30`
The Training Planner shows the periods and weekly rules in the schedule summary and in the All spaces overview.
Configure Training Areas
A Training Area is one simultaneous training opportunity within a SpaceSchedule. It is the unit that receives a Team allocation.
When adding an area:
Give it a clear local name, such as `Zone 1` or `Court A`.
Select the Space Type it provides.
Add the area to the schedule.
Repeat for each simultaneous area available in that schedule.
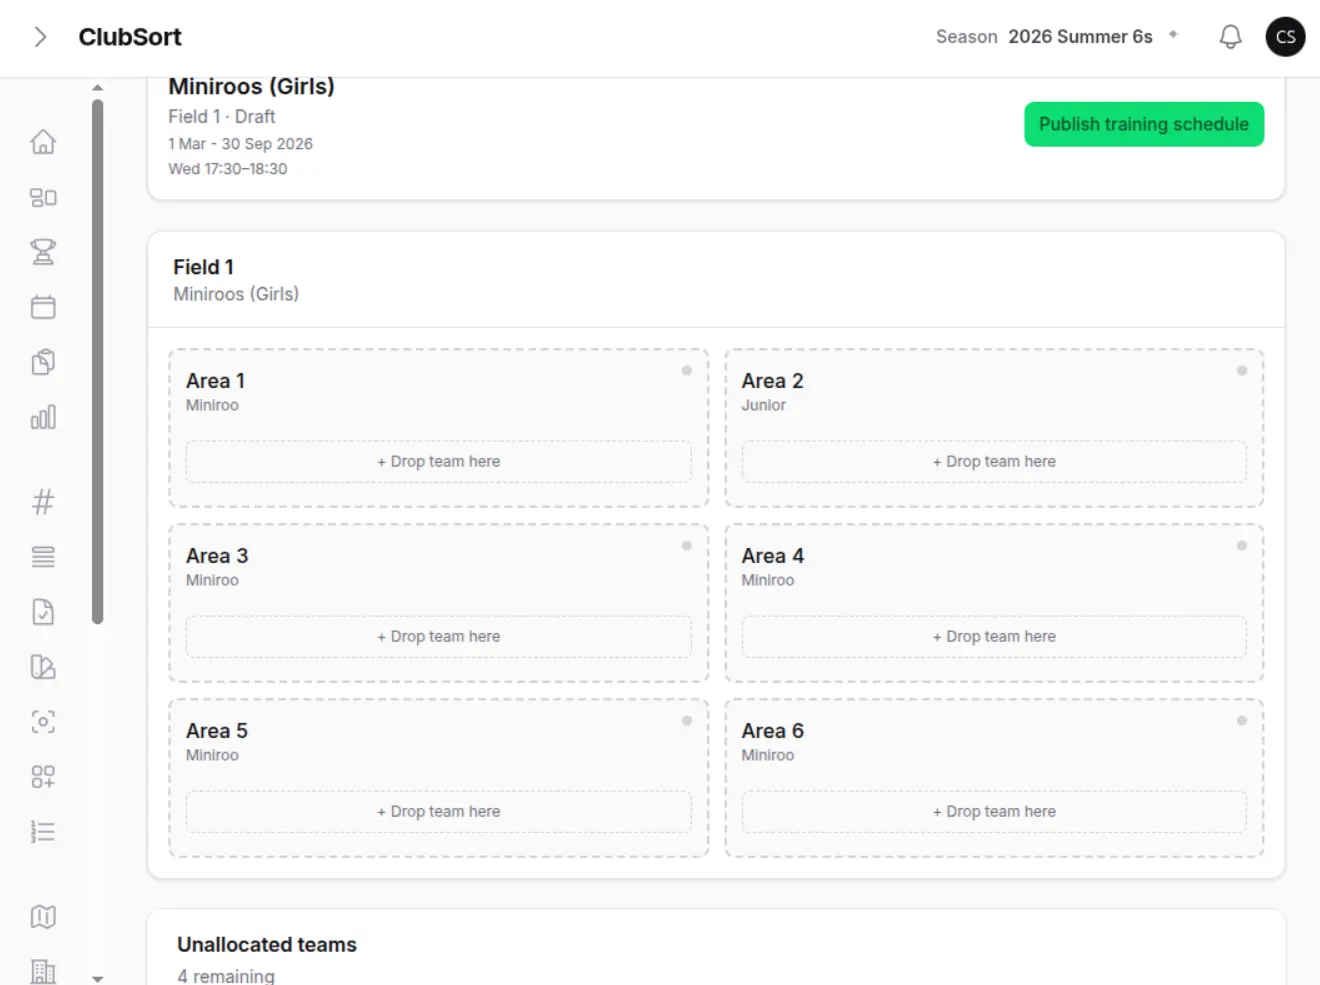
The Planner shows an area as available when it has no Team and allocated when it contains a Team. An area accepts only a Team whose Age requires the same Space Type.
Capacity and availability
The schedule summary uses:
Allocated areas: areas currently containing a Team in the selected planner state.
Available areas: configured areas that do not currently contain a Team.
Changing the number or Space Type of Training Areas changes what can be allocated, but it does not create an allocation by itself.
Allocate Teams in Planner
Screenshot
Training Planner allocation
Show: Teams being allocated to available Training Areas in the Planner.
Purpose: Show the final visual scheduling workflow.
Who can do this?
Custodians and Directors.
How to do it
Open Spaces → Planner.
Use the Space Schedule selector.
Selecting a schedule immediately opens its current allocation planner.
Review the schedule name, physical Space, publication state, date periods and weekly rules.
Drag an available Team to a compatible empty Training Area.
Move a Team to another area when required, or remove it from an area with the remove control.
Review the allocation summary and Team progress.
Select Publish training schedule for a new schedule, or Publish changes when changing a published schedule.
The Planner remains the single editing interface for allocations. It does not create Events or date-by-date occurrences.
Understand Team training frequency
A Team's training frequency is the number of schedule-level allocations it requires. The Planner keeps a Team in the unallocated list until that number has been satisfied across distinct SpaceSchedules.
For example:
A Team with frequency `1` leaves the list after one valid allocation.
A Team with frequency `2` remains available after its first allocation and shows `1 / 2`.
After its second valid allocation on another SpaceSchedule, it shows `2 / 2` and no longer requires another allocation.
A Team can have only one allocation in a particular SpaceSchedule. Multiple weekly rules within one schedule still represent one schedule-level allocation, not multiple Team allocations.
The Planner checks the Team's Age-required Space Type before accepting a drop. See Set up your first Team for the Team setup workflow.
Use the All spaces overview
All spaces is a read-only overview for understanding the Club's complete allocation picture. It does not provide drag/drop and cannot create, remove or change allocations.
How to do it
Open Spaces → Planner.
Select All spaces beside the Space Schedule selector.
Review each active SpaceSchedule in Space order and then schedule name.
Check its Space, Published/Draft state, date periods, weekly rules and area totals.
Review the Team shown in each allocated area, including frequency progress where relevant.
Select Edit allocation on a schedule when a change is needed.
The Planner returns to the existing Schedule view with that SpaceSchedule selected.
Draft schedules appear in All spaces so administrators can review configuration before publication. The overview is limited to the current Club and is intended for review, not a second editing workflow.
Publish and update a schedule
A new schedule starts as a draft. When its areas and Teams are ready:
Open the schedule in Planner.
Confirm its periods, weekly rules and area assignments.
Select Publish training schedule.
Confirm the action.
The schedule shows Published when its saved allocation matches the current planner state.
To change a published allocation:
Open the schedule in Planner.
Move or remove a Team, or place a Team in a different compatible area.
The summary shows Changes pending.
Select Publish changes.
Confirm the action.
Publishing saves the standing Team-to-SpaceSchedule-to-Training Area relationships. It does not generate Events, notifications or attendance records.
Generate draft Training Events
Once a Team has published Training Allocations, an authorised user can generate its recurring Training Events from the Team area. Generation is deliberately user-triggered; publishing a schedule or allocation does not create Events automatically.
Who can do this?
Users who can create Events and view the Team. In the current workflow, this is normally a Custodian or Director. Coaches and Managers are not granted access to schedule-based generation solely because they can view or manage a Team.
Before you start
The Team must have one or more confirmed Training Allocations belonging to published SpaceSchedules. Draft schedules, unpublished schedules, draft allocation proposals and unsaved Planner changes are not eligible.
How to do it
Open Teams and select the Team.
Review the Training Allocations section on the Team Hub.
Confirm the displayed SpaceSchedule, physical Space, Training Area, weekly day and time.
Select Generate draft training sessions.
Review the confirmation count showing how many new sessions will be created and how many already exist.
Confirm Generate draft training sessions.
ClubSort creates normal Training Events as drafts. Review and complete them through the existing Create an Event and Event management workflow.
Each published allocation is processed independently. The allocation's SpaceSchedule periods determine the valid dates, and each weekly rule produces its own set of matching dates. Period boundaries are inclusive, and dates in breaks between separate periods are excluded.
For example, one allocation with Monday and Wednesday weekly rules creates both Monday and Wednesday Training Events. A Team with two allocations receives the occurrences from both schedules. The Team's training frequency determines how many allocations it needs; it does not multiply the number of Events generated by each allocation.
Generated drafts preserve the Team, Space, Training Area, date, start time and end time. They remain inactive drafts with sharing and tracking disabled until an authorised user reviews and activates or otherwise completes them using the normal Event workflow. Generation does not publish Events, send notifications, create Attendance records, attach Plans or modify the source schedule.
Generate again safely
Generation is safe to repeat. If a matching Training Event already exists for the Team and occurrence, whether it is a draft or an existing non-draft Event, ClubSort skips it and reports it as already existing. Existing manually-created Events are not deleted or overwritten.
Changing a SpaceSchedule after generation does not rewrite previously generated Events. Future generation uses the current published schedule, while existing Events remain records of the occurrences that were already created.